はじめに
Three.jsとSwierでつくるWebGL表現のスライダーの作り方を解説している記事がないので、試しに作ってみました!今回解説するのは所謂、Liquidスライダーと呼ばれるエフェクト効果を持ったスライダーを作っていきます。ノイズはシェーダーでは作らないで、テクスチャ画像を使っています。
上のデモページで今回作るスライダーを試すことができます。
👇は今回のリポジトリです!Astro環境で作ってますので適宜置き換えてもらえればと
考え方
デモのようなLiquidスライダーは、CSSのみでは実現できないのでWebGL、Three.jsを使って実現していきます。
LiquidエフェクトはThree.jsで作るCanvasに掛けます。Swiperでのスライダー画像類は、スワイプなどの操作で動作するために存在します。なので、Swiperでのスライダー画像を下に配置してopacity: 0にし見えなくし、Three.jsで作ったCanvasを上に配置します。
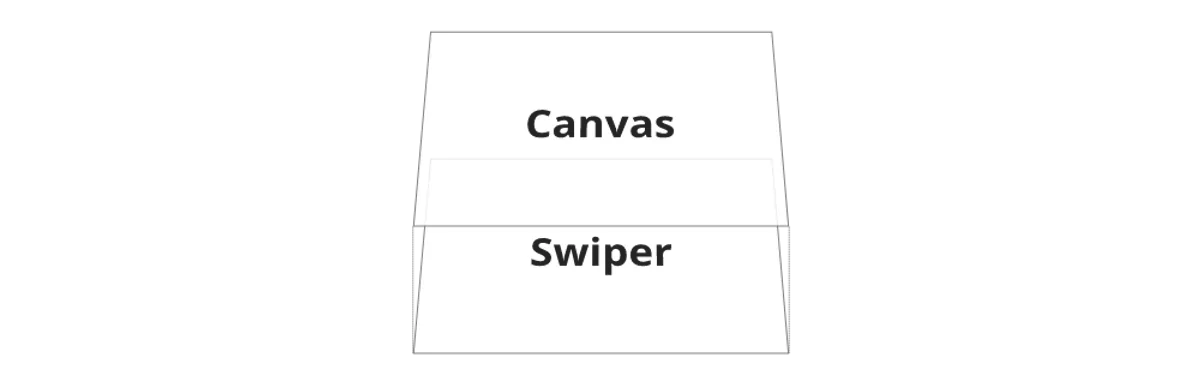
上記の図は、スライダーのレイヤーを示しています。まずは、このようにHTMLを準備していきましょう!
HTML
HTMLは以下のようになります。
<div class="container">
// Swiper
<div class="swiper">
<div class="swiper-wrapper">
<div class="swiper-slide">
<img src="images/image-01.jpg" alt="">
</div>
// 以下続く 今回は5枚の画像を用意
</div>
</div>
// Three.js用のCanvas
<div class="liquid-canvas"></div>
</div>HTMLは、Swiperの基本のコードと、Three.jsで使うdivを配置しています。
実際の画像を表示する箇所はCanvas上で表示するのですが、Swiperが上手く機能するように画像の枚数を揃えてください。今回は5枚の画像を用意しています。
CSS
CSSは以下のようになります。
* {
margin: 0;
padding: 0;
box-sizing: border-box;
}
canvas {
position: absolute;
top: 0;
left: 0;
z-index: -1;
width: 100%;
height: 100%;
pointer-events: none;
}
.container {
position: relative;
width: 100%;
height: 100vh;
overflow: hidden;
}
.swiper {
width: 100%;
height: 100vh;
}
.swiper-slide {
opacity: 0;
}CSSは、Three.jsで使うCanvasをposition: absoluteで上に配置しています。また、Swiperのスライダー画像はopacity: 0で見えなくしています。
JavaScript
それでは、最後にThree.jsとSwiperでLiquidスライダーを作るためのJavaScriptのコードを見ていきましょう!
ここではLiquidSliderクラスを作成し、下記のようなindex.jsで読み出すようにします。
import { LiquidSlider } from './liquidSlider';
window.addEventListener('DOMContentLoaded', () => {
const container = document.querySelector('.liquid-canvas');
const slider = new LiquidSlider({
container: container,
images: [
`/image01.jpg`,
`/image02.jpg`,
`/image03.jpg`,
`/image04.jpg`,
`/image05.jpg`,
],
noiseImage: `/disp.webp`,
});
});LiquidSliderクラスのcontainerには、Three.jsで使うCanvasを指定します。imagesには、スライダー画像のパスを配列で渡します。noiseImageには、ノイズ画像のパスを渡します。
ノイズ画像は今回はこのような画像を使ってます。ノイズ画像によってLiquidスライダーの表現が変わるので、いろいろ試してみてください!
Warning
画像のサイズが異なるとカクつくので、スライダーに使う画像のサイズは全て同じにしてください。
それでは、LiquidSliderクラスのコードを見ていきましょう!
LiquidSliderクラス
LiquidSliderクラスでは、ライブラリーとしてThree.jsとSwiper、アニメーションの操作としてGSAPを利用します。constructorまでのコードは以下のようになります。
import gsap from 'gsap';
import { Swiper } from 'swiper';
import { Autoplay, Navigation } from 'swiper/modules';
import * as THREE from 'three';
export class LiquidSlider {
constructor(options) {
this.container = options.container; // スライダーを描画するDOM要素
this.images = options.images; // 切り替える画像のURL配列
this.noiseImage = options.noiseImage; // ノイズ画像(歪みに使用)
this.width = window.innerWidth;
this.height = window.innerHeight;
this.currentIndex = 0; // 現在表示中の画像インデックス
this.isAnimating = false; // アニメーション中かどうかのフラグ
this.initThree(); // Three.jsセットアップ
this.initSwiper(); // Swiper.jsセットアップ
this.loadTextures(); // 画像とノイズのロード
this.render(); // 描画ループ開始
window.addEventListener('resize', this.onResize.bind(this)); // ウィンドウリサイズ対応
}
}constructorでは、初期状態のセットアップをし、主要な初期化メソッドやリサイズ処理を呼び出しています。続いてinitThree、initSwiper、loadTexturesメソッドなどを見ていきましょう!
initThree
initThreeメソッドでは、Three.jsのScene,Camera,Rendererをセットアップします。
initThree() {
this.scene = new THREE.Scene(); // シーン作成
this.camera = new THREE.OrthographicCamera(
this.width / -2, this.width / 2,
this.height / 2, this.height / -2,
0.1, 1000
);
// 正射影カメラ:平面描画に最適
this.renderer = new THREE.WebGLRenderer({ alpha: true });
this.renderer.setSize(this.width, this.height);
this.container.appendChild(this.renderer.domElement); // DOMに描画を追加
}this.containerにappendChildすることで、Canvasが表示されます。(ここでは.liquid-canvasの下にCanvasが追加される)
initSwiper
initSwiperメソッドでは、Swiperを初期化し、スライドが変わるタイミングでThree.js側の画像も切り替えるようにします。
initSwiper() {
this.swiper = new Swiper('.swiper', {
modules: [Navigation, Autoplay],
slidesPerView: 1,
loop: true,
speed: 2150,
navigation: {
nextEl: '.swiper-button-next',
prevEl: '.swiper-button-prev',
},
autoplay: {
delay: 6000,
disableOnInteraction: false,
},
on: {
// スライド開始時にテクスチャ切り替え用アニメーション処理を実行
slideChangeTransitionStart: slider => {
const newIndex = slider.realIndex;
const total = this.textures.length;
// スライドの方向判定
const diff = newIndex - this.currentIndex;
const forward = (diff > 0 && diff < total / 2) || diff < -total / 2;
// uEffect の値でノイズ歪み方向を制御
this.uniforms.uEffect.value = forward ? -0.1 : 0.1;
this.nextSlide(newIndex);
},
},
});
}Swiperの設定では、slidesPerViewを1に設定し、1枚の画像が表示されます。autoplayも設定することで、自動でスライドが切り替わるようになります。
slideChangeTransitionStartイベントは、スライドが切り替わるタイミングで実行されるイベントです。ここではシェーダー側で利用するuEffectの値を切り替えています。スライダーのNextボタンを押しているかPrevボタンが押されたかを判定し、uEffectに正負の値を渡すことで、ノイズによる歪み方向を制御しています。
また、swiper.realIndexで次のスライドのインデックスを取得し、nextSlideメソッドに渡して画像を切替えます。こちらは後で見ていきましょう!
loadTextures
loadTexturesメソッドでは、THREE.TextureLoaderで画像とノイズ画像を非同期にロードします。
loadTextures() {
const loader = new THREE.TextureLoader();
const imagePromises = this.images.map(src => loader.loadAsync(src));
const noisePromise = loader.loadAsync(this.noiseImage);
Promise.all([...imagePromises, noisePromise]).then(results => {
this.textures = results.slice(0, -1); // 通常画像
this.noiseTexture = results[results.length - 1]; // ノイズ画像
this.createMesh(); // メッシュ作成
});
}this.texturesには、slice関数を使ってスライドに表示する画像を配列で格納しています。this.noiseTextureには、ノイズ画像を格納します。
非同期に画像のロードが終わったら、createMeshメソッドを呼び出して、メッシュを作成します。
createMesh
createMeshメソッドでは、Three.jsのメッシュを作成します。
createMesh() {
// 表示中と次の画像テクスチャを取得
const texture1 = this.textures[this.currentIndex];
const texture2 =
this.textures[(this.currentIndex + 1) % this.textures.length];
const { planeWidth, planeHeight } = this.getCoverSize(texture1);
}texture1には現在のスライドの画像を、texture2には次のスライドの画像を格納します。planeWidthとplaneHeightは、getCoverSizeメソッドで現在の画像のサイズを取得しています。getCoverSizeメソッドは下記のようになります。
getCoverSize
getCoverSize(texture) {
// テクスチャが画面を覆うようにサイズを計算(cover 相当)
const imageAspect = texture.image.width / texture.image.height;
const screenAspect = this.width / this.height;
let planeWidth = this.width;
let planeHeight = this.height;
if (screenAspect > imageAspect) {
// 横幅優先で拡大
planeWidth = this.width;
planeHeight = this.width / imageAspect;
} else {
// 高さ優先で拡大
planeHeight = this.height;
planeWidth = this.height * imageAspect;
}
return { planeWidth, planeHeight };
}getCoverSizeメソッドでは、画面のアスペクト比と画像のアスペクト比を比較して、どちらの辺を優先して拡大するかを決定します。これにより、画像が画面にぴったり収まるようにサイズを計算することができ表示する画像のアスペクト比を維持したまま画面に表示することができます。
続いてシェーダーで使うユニフォーム変数を定義します。
createMesh() {
// ...
// シェーダーに渡すユニフォーム変数を定義
this.uniforms = {
uProgress: { value: 0 },
uEffect: { value: -0.1 },
uTexture1: { value: texture1 },
uTexture2: { value: texture2 },
uNoiseTexture: { value: this.noiseTexture },
uResolution: { value: new THREE.Vector2(this.width, this.height) },
};
}ユニフォーム変数の役割は下記の通りです。
uProgress: スライドの進行度を表す値(0~1)uEffect: 歪みの強度と方向を制御する値uTexture1、uTexture2: 現在と次のスライドの画像uNoiseTexture: ノイズ画像uResolution: 描画領域のサイズ
続いて、シェーダーを見ていきましょう!
createMesh() {
// ...
// 頂点シェーダー(UV座標のパススルー)
const vertexShader = `
varying vec2 vUv;
void main() {
vUv = uv;
gl_Position = projectionMatrix * modelViewMatrix * vec4(position, 1.0);
}
`;
// フラグメントシェーダー(ノイズに基づく歪みエフェクト付きのクロスフェード)
const fragmentShader = `
uniform sampler2D uTexture1;
uniform sampler2D uTexture2;
uniform sampler2D uNoiseTexture;
uniform float uProgress;
uniform float uEffect;
varying vec2 vUv;
void main() {
vec2 uv = vUv;
vec4 noise = texture2D(uNoiseTexture, uv);
vec2 distortedPosition = vec2(
uv.x + uProgress * (noise.r * uEffect),
uv.y + uProgress * (noise.g * uEffect)
);
vec2 distortedPosition2 = vec2(
uv.x - (1.0 - uProgress) * (noise.r * uEffect),
uv.y - (1.0 - uProgress) * (noise.g * uEffect)
);
vec4 texture1 = texture2D(uTexture1, distortedPosition);
vec4 texture2 = texture2D(uTexture2, distortedPosition2);
gl_FragColor = mix(texture1, texture2, vec4(uProgress));
}
`;
}ここではフラグメントシェーダーについて詳しく見ていきましょう。
fragmentShader
フラグメントシェーダーでは2枚の画像テクスチャを、ノイズを使ってゆがませたUV座標で描画し、それらを混ぜ合わせることで、流体のような滑らかな遷移を作ることができます。
シェーダーの処理構造は、下記の通りです。
uniform sampler2D uTexture1; // 現在の画像
uniform sampler2D uTexture2; // 次の画像
uniform sampler2D uNoiseTexture; // 歪みに使うノイズ画像
uniform float uProgress; // アニメーションの進行度(0 → 1)
uniform float uEffect; // 歪み方向・強さ
varying vec2 vUv; // フラグメントのUV座標noise変数は、ノイズ画像からテクスチャをサンプリングして取得します。
// ノイズ画像からこのピクセル位置の色(r, g, b)を取得
// r → x方向の歪みに使う、g → y方向の歪みに使う
vec4 noise = texture2D(uNoiseTexture, uv);distortedPositionとdistortedPosition2は、それぞれ現在の画像と次の画像の歪みを計算したUV座標です。
// 今の画像のUVを歪ませる
vec2 distortedPosition = vec2(
uv.x + uProgress * (noise.r * uEffect),
uv.y + uProgress * (noise.g * uEffect)
);
// 次の画像のUVも逆方向に歪ませる
vec2 distortedPosition2 = vec2(
uv.x - (1.0 - uProgress) * (noise.r * uEffect),
uv.y - (1.0 - uProgress) * (noise.g * uEffect)
);uProgress: 0→1にアニメーションされるuEffect: +0.1または-0.1で方向を切り替え
結果的に、歪ながら2つの画像が混ざり合うことで、流体のような滑らかな遷移を実現しています。
texture1とtexture2は、それぞれdistortedPositionとdistortedPosition2を使って画像を取得します。
vec4 texture1 = texture2D(uTexture1, distortedPosition);
vec4 texture2 = texture2D(uTexture2, distortedPosition2);各画像を「歪ませたUV座標」でサンプリングしているので、画像が歪んで表示されます。
最後に、gl_FragColorに2つの画像をmix関数で混ぜ合わせます。
gl_FragColor = mix(texture1, texture2, vec4(uProgress));uProgressが0の時:texture1のみ表示uProgressが1の時:texture2のみ表示- 中間:歪ませながら2つの画像を混ぜ合わせて表示
このフラグメントシェーダーによって、Liquid効果を実現することができました🥃
それでは、createMeshメソッドの最後にThree.jsのメッシュを作成します。
createMesh() {
// ...
// 平面ジオメトリとシェーダーマテリアルを作成
const geometry = new THREE.PlaneGeometry(planeWidth, planeHeight, 1, 1);
const material = new THREE.ShaderMaterial({
uniforms: this.uniforms,
vertexShader,
fragmentShader,
transparent: true,
});
// メッシュを作成してシーンに追加
this.mesh = new THREE.Mesh(geometry, material);
this.scene.add(this.mesh);
}これで、メッシュの作成が完了しました。
続いて、画像スライダーの切替を行うnextSlideメソッドなどを見ていきましょう!
nextSlide
nextSlideメソッドでは、次の画像へのスライド遷移アニメーションを実行します。ここでは、GSAPを使ってuProgressを0から1にアニメーションさせています。完了したらuTexture1とuTexture2を新しい画像に更新します。
nextSlide(nextIndex) {
// すでにアニメーション中なら無視
if (this.isAnimating) return;
this.isAnimating = true;
const nextTexture = this.textures[index];
this.uniforms.uTexture2.value = nextTexture;
// GSAP で uProgress をアニメーションさせて滑らかに遷移
gsap.to(this.uniforms.uProgress, {
value: 1,
duration: 2.15,
ease: 'power3.out',
onComplete: () => {
// 次のスライドに切り替え完了後の処理
this.currentIndex = index;
this.uniforms.uTexture1.value = nextTexture;
this.uniforms.uProgress.value = 0;
// さらに次のスライドを予めセット
const nextIndex = (this.currentIndex + 1) % this.textures.length;
this.uniforms.uTexture2.value = this.textures[nextIndex];
// 表示サイズを更新
this.updateMeshSize();
this.isAnimating = false;
},
});
}ここで、GSAPのdurationはSwiperのspeedと同じ値にしましょう。
アニメーション完了後に呼び出すupdateMeshSizeメソッドは、下記のようになります。
updateMeshSize
updateMeshSize() {
// メッシュのサイズを再計算して更新
if (!this.mesh) return;
const texture = this.textures[this.currentIndex];
const { planeWidth, planeHeight } = this.getCoverSize(texture);
this.mesh.geometry.dispose(); // 古いジオメトリを破棄
this.mesh.geometry = new THREE.PlaneGeometry(planeWidth, planeHeight, 1, 1);
}このメソッドの役割は、画像の切り替え後に、表示中画像のサイズを再計算し、メッシュのジオメトリを更新することです。これにより、画像のサイズが変わった際にも、メッシュが正しく表示されるようになります。
続いてリサイズ時の処理を見ていきましょう!
onResize
画面サイズ変更時に、カメラ・レンダラー・解像度・メッシュサイズをすべて更新します。
onResize() {
// 画面サイズ変更時の処理
this.width = window.innerWidth;
this.height = window.innerHeight;
this.camera.left = -this.width / 2;
this.camera.right = this.width / 2;
this.camera.top = this.height / 2;
this.camera.bottom = -this.height / 2;
this.camera.updateProjectionMatrix();
this.renderer.setSize(this.width, this.height);
if (this.uniforms.uResolution) {
this.uniforms.uResolution.value.set(this.width, this.height);
}
this.updateMeshSize();
}最後にrenderメソッドを見ていきましょう!
render
renderメソッドでは、Three.jsのレンダリングループを実行します。
render() {
// 毎フレーム Three.js の描画を更新
this.renderer.render(this.scene, this.camera);
requestAnimationFrame(this.render.bind(this));
}requestAnimationFrameを使って毎フレームレンダリングを行います。
これで、Three.jsとSwiper.jsを組み合わせた画像スライダーの実装が完了しました。
まとめ
この記事では、Three.jsとSwiper.jsを組み合わせたLiquid効果を持つ画像スライダーの実装方法を解説しました。Three.jsとSwiperを組み合わせる方法を確かめられたので良かったです。
スライダーの実装をSwiperなどのスライドライブラリーに任せることで、WebGLやThree.jsの表現に専念できるので良いですね!
この記事が参考になれば幸いです。
参考
- Threejs with swiper(CodePen)