はじめに
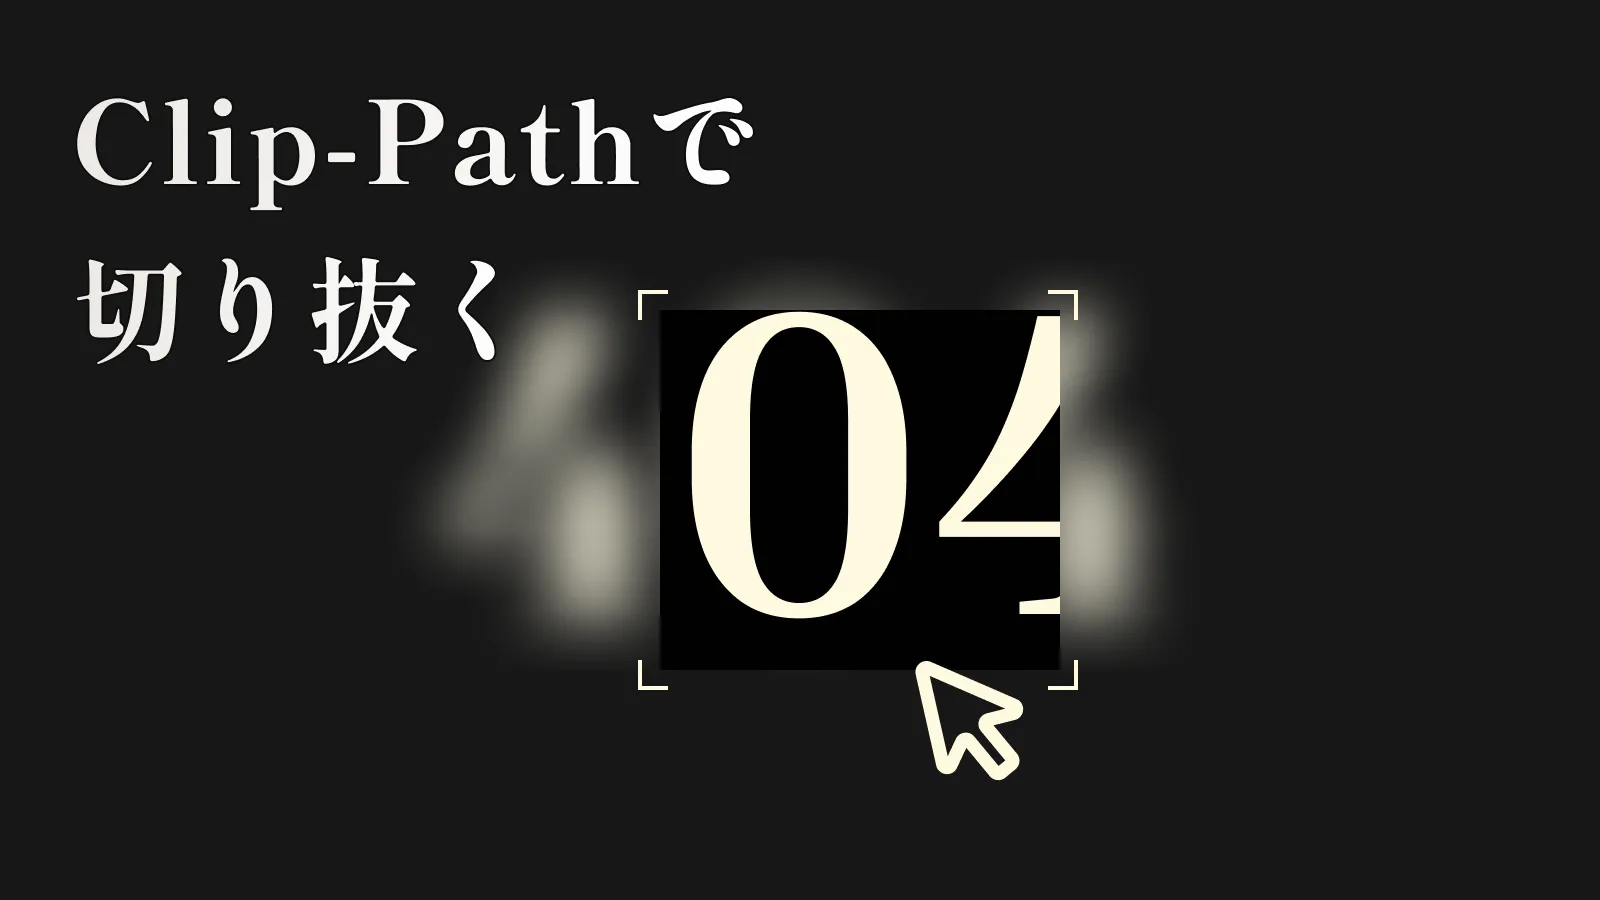
↓のサイトの404ページが面白そうだったので真似して実装してみました。
Dondre Green
今回やることは、画面全面にblurがかかった背景をマウス移動でかつclip-pathを使って、背景を切り抜くインタラクティブな実装になります。
アニメーションの制御にはGSAPを使います🍀
👇は完成形のCodePenデモです!
それでは見ていきましょう!
HTMLとCSS
まずは基本的なHTMLとCSSを見ていきましょう!
HTML
JavaScriptで操作するのに必要なものだけ抜粋します。
<div class="container">
<!-- 背景のblur -->
<div class="overlay"></div>
<!-- マウスストーカー -->
<div class="cursor">
<div class="cursor-deco-wrap">
<div class="cursor-deco"></div>
<div class="cursor-deco"></div>
<div class="cursor-deco"></div>
<div class="cursor-deco"></div>
</div>
</div>
</div>blurがかかった背景は.overlayで、マウスストーカーを.cursorクラスにしてます!🐭
それではCSSを見ていきましょう!
CSS
今回の実装に関係がありそうな箇所は以下のコードになります
.container {
width: 100vw;
height: 100vh;
background: #010101;
color: #fefae0;
display: grid;
place-items: center;
position: relative;
overflow: hidden;
}
.overlay {
width: 100%;
height: 100%;
position: fixed;
inset: 0;
backdrop-filter: blur(20px);
z-index: 2;
}
.cursor {
width: 20vw;
height: 20vw;
position: absolute;
left: 50%;
top: 50%;
translate: -50% -50%;
z-index: 3;
}
.cursor-deco {
width: 24px;
height: 24px;
position: absolute;
border-color: #fefae0;
border-width: 2px;
&:nth-child(1) {
border-left: 1px solid;
border-top: 1px solid;
top: 0;
left: 0;
}
&:nth-child(2) {
border-right: 1px solid;
border-top: 1px solid;
top: 0;
right: 0;
}
&:nth-child(3) {
border-left: 1px solid;
border-bottom: 1px solid;
bottom: 0;
left: 0;
}
&:nth-child(4) {
border-right: 1px solid;
border-bottom: 1px solid;
bottom: 0;
right: 0;
}
}背景のblurはbackdrop-filter: blur(20px);で表現できます!
また、マウスストーカーの飾り(.cursor-deco)は前面に出てほしいのでz-indexを.overlayより大きくしてます。
最後にJavaScriptになります!
JavaScript
👇は今回のJavaScriptの全コードになります。
class MouseClipBlur {
constructor() {
this.mouse = document.querySelector('.cursor');
if(!this.mouse) return
this.init();
}
init() {
this.overlay = document.querySelector('.overlay');
const setClipPathValue = this.getMaskValue(window.innerWidth/2, window.innerHeight/2)
gsap.set(this.overlay, { clipPath: setClipPathValue });
window.addEventListener('mousemove', (e) => this.onMouseMove(e));
}
onMouseMove(e) {
gsap.to(this.mouse, {
x: e.clientX,
y: e.clientY,
top: 0,
left: 0,
duration: 0.5,
onStart: () => {
this.updateMask(e.clientX, e.clientY);
}
})
}
getMaskValue(x, y) {
const { width, height } = this.mouse.getBoundingClientRect();
const offset = 40;
const boxWidth = width - offset; // 切り抜く四角形の幅
const boxHeight = height - offset; // 切り抜く四角形の高さ
const viewportWidth = window.innerWidth;
const viewportHeight = window.innerHeight;
const left = Math.max(x - boxWidth / 2, 0);
const top = Math.max(y - boxHeight / 2, 0);
const right = Math.min(x + boxWidth / 2, viewportWidth);
const bottom = Math.min(y + boxHeight / 2, viewportHeight);
const clipPathValue = `polygon(
0% 0%,
0% 100%,
${left}px 100%,
${left}px ${top}px,
${right}px ${top}px,
${right}px ${bottom}px,
${left}px ${bottom}px,
${left}px 100%,
100% 100%,
100% 0%
)`;
return clipPathValue;
}
updateMask(x, y) {
gsap.to(this.overlay, {
clipPath: this.getMaskValue(x, y),
duration: 0.2,
});
}
}
new MouseClipBlur();マウスストーカーやclip-pathの値の設定はGSAPを使ってます!
まずは、マウスストーカーのonMouseMove()を見てみましょう!
onMouseMove()
onMouseMove(e) {
gsap.to(this.mouse, {
x: e.clientX,
y: e.clientY,
top: 0,
left: 0,
duration: 0.5,
onStart: () => {
this.updateMask(e.clientX, e.clientY);
}
})
}これはただのマウスストーカーなので説明がいらないかと思いますが、onStartでアニメーション開始時に背景をclip-pathで切り抜くupdateMask()メソッドを実行します。
updateMask()
updateMask(x, y) {
gsap.to(this.overlay, {
clipPath: this.getMaskValue(x, y),
duration: 0.2,
});
}getMaskValue()は、マウス位置(x,y)を引数として渡すことでclip-pathで切り抜けるマウス位置に応じた正方形の切り抜きの値を返してくれます。
こうすることで、blurがかかった背景をclip-pathで切り抜くことができます。
最後にマウス位置に応じた正方形の切り抜きの値を返すgetMaskValue()メソッドを見てみましょう!
getMaskValue()
今回で一番分かりづらい箇所かと思いますが、以下のようになります。
getMaskValue(x, y) {
const { width, height } = this.mouse.getBoundingClientRect();
const offset = 40;
const boxWidth = width - offset; // 切り抜く四角形の幅
const boxHeight = height - offset; // 切り抜く四角形の高さ
const viewportWidth = window.innerWidth;
const viewportHeight = window.innerHeight;
const left = Math.max(x - boxWidth / 2, 0);
const top = Math.max(y - boxHeight / 2, 0);
const right = Math.min(x + boxWidth / 2, viewportWidth);
const bottom = Math.min(y + boxHeight / 2, viewportHeight);
const clipPathValue = `polygon(
0% 0%,
0% 100%,
${left}px 100%,
${left}px ${top}px,
${right}px ${top}px,
${right}px ${bottom}px,
${left}px ${bottom}px,
${left}px 100%,
100% 100%,
100% 0%
)`;
return clipPathValue;
}clip-pathで正方形で切り抜く箇所が複雑ですね〜。
こちらの11個の値は↓のジェネレーターの「Frame」を参考にしました!
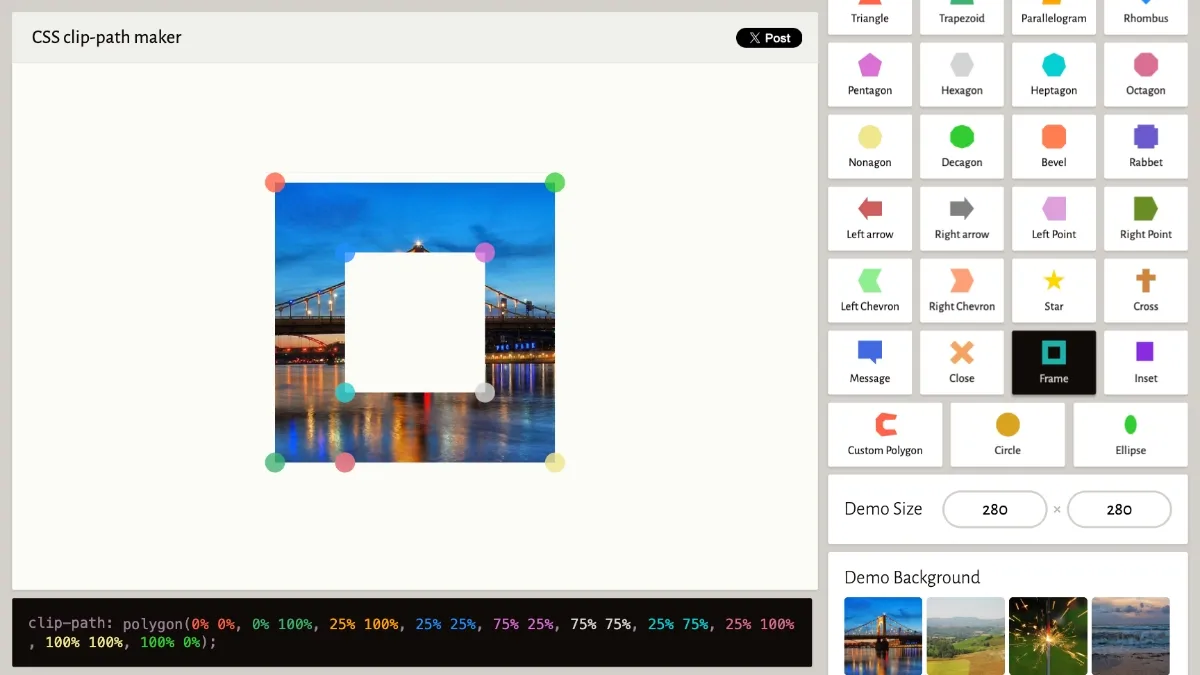
ここではleftの値の算出方法について考えてみましょう。
const { width, height } = this.mouse.getBoundingClientRect();
const offset = 40;
const boxWidth = width - offset; // 切り抜く四角形の幅
const left = Math.max(x - boxWidth / 2, 0);this.mouseはマウスストーカー(.cursor)のことで、getBoundingClientRect()でマウスストーカーの横幅と縦幅を取得します。ここで、マウスストーカーには飾り(.cursor-deco)があるのでoffset分を引いて正方形の内側で切り抜くことで被らないようにしてます。
最後にマウス位置の左側の座標を取得したいので、マウス位置から切り抜く四角形の幅(boxWidth)の半分を引くことで左側の座標を取得できます。
四角形が画面外にでるとマイナスの値になるので、Math.max()を使って最小を0にしてます。
top,bottom,rightに関しても同様の考え方になります!
init()
最後にinit()でclip-pathをセットしている理由ですが、初回表示時に画面中心を切り抜くようにするためにセットしています。なので忘れずに記載しておきましょう!
init() {
this.overlay = document.querySelector('.overlay');
const setClipPathValue = this.getMaskValue(window.innerWidth/2, window.innerHeight/2)
gsap.set(this.overlay, { clipPath: setClipPathValue });
window.addEventListener('mousemove', (e) => this.onMouseMove(e));
}
まとめ
マウス移動で背景を切り抜くclip-pathとblurを使った動的デザインの作り方を解説しました。
最近見たサイトで真似してみたい実装だったので、今回取り上げてみました。
今後も真似したいサイトを見つけたら実装し解説していきたいと思います!
この記事が参考になれば幸いです。