はじめに
今回は、JavaScriptでマウス距離に応じて色やフォントウェイトが変わるグリッドエフェクトの実装方法を解説します。
アニメーションの参考にしたサイトは👇️になります。
マウスの距離で色が変わるグリッド
まず最初に基礎として、上記のCodePenのデモのようにマウスの距離でグリッドの色が変わる表現を実装してみましょう。
グリッドの線は、JavaScriptで計算して描画することにします。デモでは、12行12列のグリッドを描画します。
それでは、実装を見ていきましょう!
HTML
HTMLは、JavaScriptで取得するため、.gridクラスを付与した空のdiv要素を1つ用意します。
<div class="grid"></div>CSS
グリッドを12行12列にします。また、あとでJavaScriptでグリッドの構成要素(.grid-cell)を追加するので、.grid-cellに線などのスタイルを追加します。
.grid {
display: grid;
grid-template-columns: repeat(12, 1fr);
overflow-x: hidden;
}
.grid-cell {
border: 1px solid var(--white);
}JavaScript
JavaScriptは、グリッドの線を描画するのと、マウス位置に応じてグリッドの色を変える処理を実装します。
次はclass構文で書いてある全コードになります。
class Grid {
constructor() {
this.el = document.querySelector('.grid');
if(!this.el) return;
this.init();
}
init() {
this.cols = 12;
this.rows = 12;
this.drawGrid();
this.updateCellSizes();
window.addEventListener('resize', this.updateCellSizes.bind(this));
this.el.addEventListener('mousemove', (e) => this.onMouseMove(e));
this.el.addEventListener('mouseleave', () => this.resetColors());
}
drawGrid() {
for (let i = 0; i < this.cols * this.rows; i++) {
const cell = document.createElement('div');
cell.classList.add('grid-cell');
this.el.appendChild(cell);
}
}
updateCellSizes() {
const gridWidth = this.el.clientWidth;
const cellSize = gridWidth / this.cols;
this.el.style.display = "grid";
this.el.style.gridTemplateColumns = `repeat(${this.cols}, ${cellSize}px)`;
this.el.style.gridTemplateRows = `repeat(${this.rows}, ${cellSize}px)`;
const cells = this.el.querySelectorAll('.grid-cell');
cells.forEach(cell => {
cell.style.width = cellSize + 'px';
cell.style.height = cellSize + 'px';
});
}
onMouseMove(e) {
const rect = this.el.getBoundingClientRect();
const mouseX = e.clientX - rect.left;
const mouseY = e.clientY - rect.top;
const cells = this.el.querySelectorAll('.grid-cell');
cells.forEach(cell => {
const cellRect = cell.getBoundingClientRect();
// セルの中心座標
const cellCenterX = (cellRect.left - rect.left) + cellRect.width / 2;
const cellCenterY = (cellRect.top - rect.top) + cellRect.height / 2;
const dx = mouseX - cellCenterX;
const dy = mouseY - cellCenterY;
const distance = Math.sqrt(dx * dx + dy * dy);
const maxDist = 300; // 色が薄くなる距離
const intensity = Math.max(0, 1 - distance / maxDist);
cell.style.backgroundColor = `rgba(255, 0, 0, ${intensity})`;
});
}
resetColors() {
const cells = this.el.querySelectorAll('.grid-cell');
cells.forEach(cell => {
cell.style.backgroundColor = "transparent";
});
}
}
new Grid();それでは、解説していきます!
初期設定 init
init() {
this.cols = 12;
this.rows = 12;
this.drawGrid();
this.updateCellSizes();
window.addEventListener('resize', this.updateCellSizes.bind(this));
this.el.addEventListener('mousemove', (e) => this.onMouseMove(e));
this.el.addEventListener('mouseleave', () => this.resetColors());
}initメソッドは、クラスの初期化処理を行います。このメソッドでは、グリッドの列数と行数を12に設定し、グリッドを描画し、セルのサイズを更新します。また、リサイズイベントとマウス移動イベントをリッスンし、それぞれのイベントに対応するメソッドを呼び出します。
グリッドの生成 drawGrid
drawGrid() {
for (let i = 0; i < this.cols * this.rows; i++) {
const cell = document.createElement('div');
cell.classList.add('grid-cell');
this.el.appendChild(cell);
}
}グリッドの列数と行数分のセル(grid-cell)をthis.el(.grid)にappendChildで追加します。ここでは、12*12より144個のセルを追加しています。
この時点では、サイズは決まってないので、セルのサイズを更新するメソッドupdateCellSizesを見てみましょう!
セルのサイズを更新する updateCellSizes
updateCellSizes() {
const gridWidth = this.el.clientWidth;
const cellSize = gridWidth / this.cols;
this.el.style.display = "grid";
this.el.style.gridTemplateColumns = `repeat(${this.cols}, ${cellSize}px)`;
this.el.style.gridTemplateRows = `repeat(${this.rows}, ${cellSize}px)`;
const cells = this.el.querySelectorAll('.grid-cell');
cells.forEach(cell => {
cell.style.width = cellSize + 'px';
cell.style.height = cellSize + 'px';
});
}ここでやっていることは、コンテナの幅(.grid)を取得して、その幅をグリッドの列数(12)で割ることで、セルの幅を計算しています。例えば、コンテナの幅が1200pxの場合、セルの幅は100pxになります。
その後に、.gridに再度display: gridを設定し、grid-template-columnsとgrid-template-rowsを列数・行数と計算したセル幅で設定しています。各セルの幅と高さを同じにしているので、グリッドが正方形になります。
マウスの距離に応じてセルの色を変える onMouseMove
onMouseMoveメソッドは、マウスがグリッド上で移動したときに呼び出されます。このメソッドでは、マウスの座標を取得し、各セルの色を変更します。
onMouseMove(e) {
const rect = this.el.getBoundingClientRect();
const mouseX = e.clientX - rect.left;
const mouseY = e.clientY - rect.top;
}mouseXとmouseYは、グリッド内でのマウスの座標を取得します。
onMouseMove(e) {
// ...
const cells = this.el.querySelectorAll('.grid-cell');
cells.forEach(cell => {
const cellRect = cell.getBoundingClientRect();
// セルの中心座標
const cellCenterX = (cellRect.left - rect.left) + cellRect.width / 2;
const cellCenterY = (cellRect.top - rect.top) + cellRect.height / 2;
const dx = mouseX - cellCenterX;
const dy = mouseY - cellCenterY;
const distance = Math.sqrt(dx * dx + dy * dy);
const maxDist = 300; // 色が薄くなる距離
const intensity = Math.max(0, 1 - distance / maxDist);
cell.style.backgroundColor = `rgba(255, 0, 0, ${intensity})`;
});
}cellCenterXとcellCenterYは、各セルの中心座標を計算しています。ここでは、セルの左上座標からセルの幅・高さを半分加えた値が中心座標になります。
dxとdyは、現在のマウス位置とセルの中心座標との差を計算することで距離を表しています。この値をsqrt関数で平方根を取ることで距離を計算しています。
intensityは、マウスの距離に応じて計算された値で、0から1の範囲の値を取ります。この値をrgba関数のアルファ値として使用することで、セルの色を変更しています。
maxDistは、色が薄くなる距離を設定しています。この値を小さくすると色が付く範囲も狭くなります。
距離が近いセルは、intensityの値が大きいので、色が濃くなり、距離が遠いセルはintensityの値が小さいので、色が薄くなります。intensityの値が0のときは、セルの色が透明なので色がつかないイメージです!
マウスがグリッドから外れた時のリセット処理 resetColors
resetColorsメソッドは、マウスがマウスがグリッドから外れたときに、セルの色をリセットするためのメソッドです。
resetColors() {
const cells = this.el.querySelectorAll('.grid-cell');
cells.forEach(cell => {
cell.style.backgroundColor = "transparent";
});
}全てのグリッドのセルの背景を透明にすることで、セルの色をリセットしています!
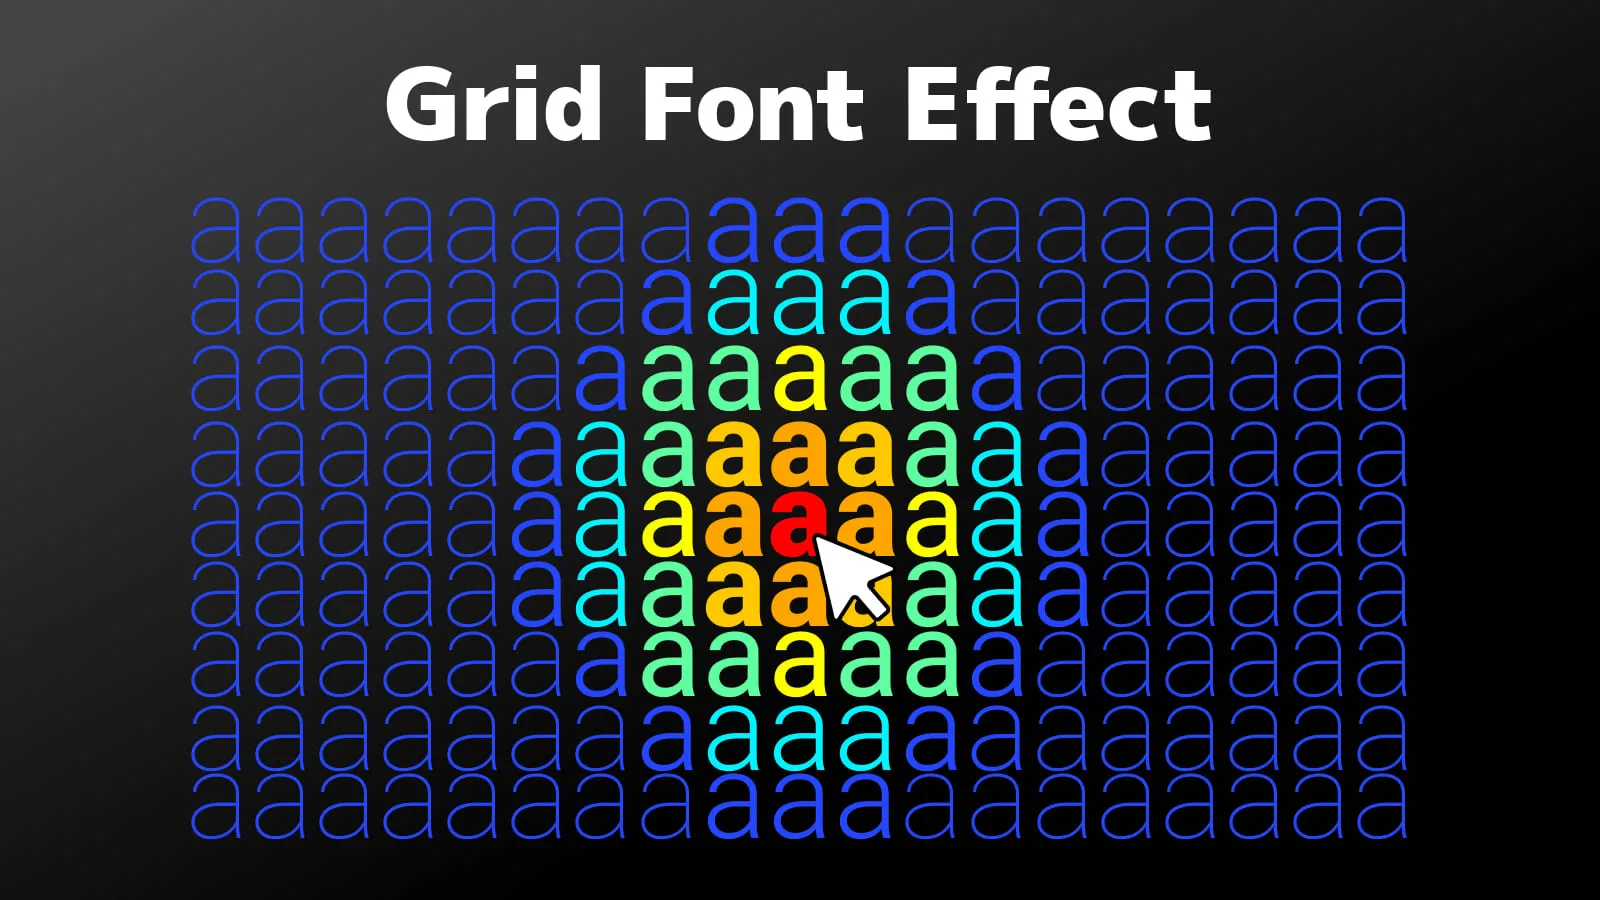
マウスの距離でフォントの色とウェイトを変える
最後に、先ほどの基本のコードを基にマウスの距離に応じてフォントの色とウェイトを変えるデモを紹介します。
フォントの色は、マウスの距離に応じて赤→オレンジ→黄→水色→青に変化します。ウェイトは距離が近いほど太くなります。
それでは、実装を見ていきましょう!
CSS
HTMLは先程と同様なので、CSSを最初に紹介します。
:root {
--blue: #2546ff;
}
.grid {
display: grid;
grid-template-columns: repeat(12, 1fr);
overflow: hidden;
}
.grid-cell {
position: relative;
}
.grid-cell .letter {
position: absolute;
left: 50%;
top: 50%;
translate: -50% -50%;
color: var(--blue);
font-size: 8vw;
font-weight: 100;
font-family: "Roboto", sans-serif;
pointer-events: none;
}.grid-cellと.letterはJavaScriptで動的に生成しています。フォントはfont-weightを自在に変更できるようなフォントを使用しましょう。このデモではRobotoを使用しています。
JavaScript
最後にJavaScriptになります。最初のデモのコードよりも少し複雑になるのと、パフォーマンス改善しています。
class Grid {
constructor() {
this.el = document.querySelector('.grid');
if (!this.el) return;
this.init();
}
init() {
this.cols = 22;
this.rows = 22;
this.cells = [];
this.mouseX = null;
this.mouseY = null;
this.drawGrid();
this.updateCellSizes();
window.addEventListener('resize', this.updateCellSizes.bind(this));
this.el.addEventListener('mousemove', (e) => {
const rect = this.el.getBoundingClientRect();
this.mouseX = e.clientX - rect.left;
this.mouseY = e.clientY - rect.top;
});
this.el.addEventListener('mouseleave', () => {
this.mouseX = null;
this.mouseY = null;
this.resetColors();
});
requestAnimationFrame(() => this.update());
}
drawGrid() {
for (let i = 0; i < this.cols * this.rows; i++) {
const cell = document.createElement('div');
const letter = document.createElement('div');
letter.textContent = 'a';
letter.classList.add('letter');
cell.appendChild(letter);
cell.classList.add('grid-cell');
this.el.appendChild(cell);
this.cells.push({ cell, letter, centerX: 0, centerY: 0 });
}
}
updateCellSizes() {
const gridWidth = this.el.clientWidth;
const cellSize = gridWidth / this.cols;
this.el.style.display = "grid";
this.el.style.gridTemplateColumns = `repeat(${this.cols}, ${cellSize}px)`;
this.el.style.gridTemplateRows = `repeat(${this.rows}, ${cellSize}px)`;
this.cells.forEach(({ cell }, i) => {
cell.style.width = cellSize + 'px';
cell.style.height = cellSize + 'px';
const row = Math.floor(i / this.cols);
const col = i % this.cols;
this.cells[i].centerX = col * cellSize + cellSize / 2;
this.cells[i].centerY = row * cellSize + cellSize / 2;
});
}
update() {
if (this.mouseX !== null && this.mouseY !== null) {
this.cells.forEach(({ letter, centerX, centerY }) => {
const dx = this.mouseX - centerX;
const dy = this.mouseY - centerY;
const distance = Math.sqrt(dx * dx + dy * dy);
const maxDist = 400;
const intensity = Math.max(0, 1 - distance / maxDist);
letter.style.fontWeight = 100 + intensity * 800;
letter.style.color = this.getColorByIntensity(intensity);
});
}
requestAnimationFrame(() => this.update());
}
getColorByIntensity(t) {
const colors = [
[37, 70, 255], // 青
[0, 255, 255], // 水色
[255, 255, 0], // 黄
[255, 165, 0], // オレンジ
[255, 0, 0], // 赤
];
const steps = colors.length - 1;
const scaled = t * steps;
const i = Math.floor(scaled);
const frac = scaled - i;
const lerp = (a, b, t) => a + (b - a) * t;
const c1 = colors[i], c2 = colors[i + 1];
const r = Math.round(lerp(c1[0], c2[0], frac));
const g = Math.round(lerp(c1[1], c2[1], frac));
const b = Math.round(lerp(c1[2], c2[2], frac));
return `rgb(${r},${g},${b})`;
}
resetColors() {
this.cells.forEach(({ letter }) => {
letter.style.color = "var(--blue)";
letter.style.fontWeight = 100;
});
}
}
new Grid();それでは、解説していきます!
初期化 init
init() {
this.cols = 22;
this.rows = 22;
this.cells = [];
this.mouseX = null;
this.mouseY = null;
this.drawGrid();
this.updateCellSizes();
window.addEventListener('resize', this.updateCellSizes.bind(this));
this.el.addEventListener('mousemove', (e) => {
const rect = this.el.getBoundingClientRect();
this.mouseX = e.clientX - rect.left;
this.mouseY = e.clientY - rect.top;
});
this.el.addEventListener('mouseleave', () => {
this.mouseX = null;
this.mouseY = null;
this.resetColors();
});
requestAnimationFrame(() => this.update());
}今回のデモでは、行と列を22個に設定しました。また、最初にthis.cellsとthis.mouseX、this.mouseYを初期化しています。これは、パフォーマンス改善のために行っています。1つ目のデモだとmousemoveイベントが発生するたびに処理を行っていたので、このように初期化することでパフォーマンスを改善しています。
また、毎フレームrequestAnimationFrameでupdateを呼んでアニメーションを実行しています。
グリッドとテキストの描画 drawGrid
drawGrid() {
for (let i = 0; i < this.cols * this.rows; i++) {
const cell = document.createElement('div');
const letter = document.createElement('div');
letter.textContent = 'a';
letter.classList.add('letter');
cell.appendChild(letter);
cell.classList.add('grid-cell');
this.el.appendChild(cell);
this.cells.push({ cell, letter, centerX: 0, centerY: 0 });
}
}今回のデモは、行と列が22なので、.grid-cellを22×22個作成します。この中にテキストaを入れてクラスをletterに設定しています。
また、各セルの情報をthis.cellsに格納しています。これで、各セルの情報を取得することができます。
セルのサイズを更新する updateCellSizes
updateCellSizes() {
const gridWidth = this.el.clientWidth;
const cellSize = gridWidth / this.cols;
this.el.style.display = "grid";
this.el.style.gridTemplateColumns = `repeat(${this.cols}, ${cellSize}px)`;
this.el.style.gridTemplateRows = `repeat(${this.rows}, ${cellSize}px)`;
this.cells.forEach(({ cell }, i) => {
cell.style.width = cellSize + 'px';
cell.style.height = cellSize + 'px';
const row = Math.floor(i / this.cols);
const col = i % this.cols;
this.cells[i].centerX = col * cellSize + cellSize / 2;
this.cells[i].centerY = row * cellSize + cellSize / 2;
});
}updateCellSizesメソッドは、1つ目のデモとほとんど同様ですが、パフォーマンス改善のためにセルの中心座標をthis.cellsに保存します。
マウス位置の取得とスタイル変更 update
update() {
if (this.mouseX !== null && this.mouseY !== null) {
this.cells.forEach(({ letter, centerX, centerY }) => {
const dx = this.mouseX - centerX;
const dy = this.mouseY - centerY;
const distance = Math.sqrt(dx * dx + dy * dy);
const maxDist = 400;
const intensity = Math.max(0, 1 - distance / maxDist);
// フォントウェイトを100~900の間で変化させる
letter.style.fontWeight = 100 + intensity * 800;
letter.style.color = this.getColorByIntensity(intensity);
});
}
requestAnimationFrame(() => this.update());
}こちらも1つ目のデモとほとんど同様です。マウスの距離に応じてフォントウェイトとフォントカラーを変化させます。アニメーションはrequestAnimationFrameで実行しています。
続いてマウスの距離に応じてフォントカラーを変化するgetColorByIntensityメソッドを実装します。
フォントカラーの設定 getColorByIntensity
getColorByIntensity(t) {
const colors = [
[37, 70, 255], // 青
[0, 255, 255], // 水色
[255, 255, 0], // 黄
[255, 165, 0], // オレンジ
[255, 0, 0], // 赤
];
}colorsの配列には、使用するフォントカラーをRGB形式で定義しておきます。マウス距離が近い順に赤→青に変化します。
getColorByIntensity(t) {
// ...
const steps = colors.length - 1;
const scaled = t * steps;
const i = Math.floor(scaled);
const frac = scaled - i;
}引数で渡されたtは、マウスの距離に応じた値です。このtを0から1の範囲に正規化し、colorsの配列のインデックスに変換します。
getColorByIntensity(t) {
// ...
const lerp = (a, b, t) => a + (b - a) * t;
const c1 = colors[i], c2 = colors[i + 1];
const r = Math.round(lerp(c1[0], c2[0], frac));
const g = Math.round(lerp(c1[1], c2[1], frac));
const b = Math.round(lerp(c1[2], c2[2], frac));
return `rgb(${r},${g},${b})`;
}線形補間(lerp)を関数で定義して、区画内の色をr、g、bで算出します。計算できたらrgb形式で返すことで、マウス距離に応じたフォントカラーが設定できることになります。
マウスがグリッドから外れた時のリセット処理 resetColors
resetColors() {
this.cells.forEach(({ letter }) => {
letter.style.color = "var(--blue)";
letter.style.fontWeight = 100;
});
}最後にマウスがグリッドから外れたらフォントカラーとフォントウェイトを初期値にリセットします。
これで解説は以上になります!
まとめ
今回のアニメーションの参考にしたサイトのように、マウスの距離に応じたグリッドのエフェクト表現の実装方法を解説しました。
1つ目のデモでは、基本としてマウス距離に応じてグリッドの色を変更する方法を解説しました。最後のデモでは、基本のデモを基に、マウスの距離に応じてフォントのカラーとウェイトを変更する方法を解説しました。
Webサイト制作では、あまりこのような実装をする機会がないかと思いますが、何かの参考になれば幸いです。